Thursday, December 30, 2010

More Aliens!

On Christmas day we had a bunch of leftover twist ties from new toy packaging and I thought they looked like hair.  ALIEN HAIR!!  Mwhoo hoo hoo ha ha ha!  The foil alien was born. 

You will note that my instructions say to add the arms and legs before the face, but the photos show that I made the hair first, then the face, and added the arms and legs last.  For goodness sake please learn from my mistakes and do as I say not as I do.  The googley eyes slid all over the place while I manhandled the alien's body trying to figure out how to make a neat and tiny hole for the arms, and the hair popped out over and over.  Fortunately it made no difference to the finished product. 

Age: 3+ (I admit I did most of the craft because of the distraction of the new Christmas toys.  But a 3 year old could do quite a bit of it. I just shamelessly used my kid as an excuse to make a foil alien out of a toilet paper tube.)
Mess/Cleanup: Just a bit of glue.
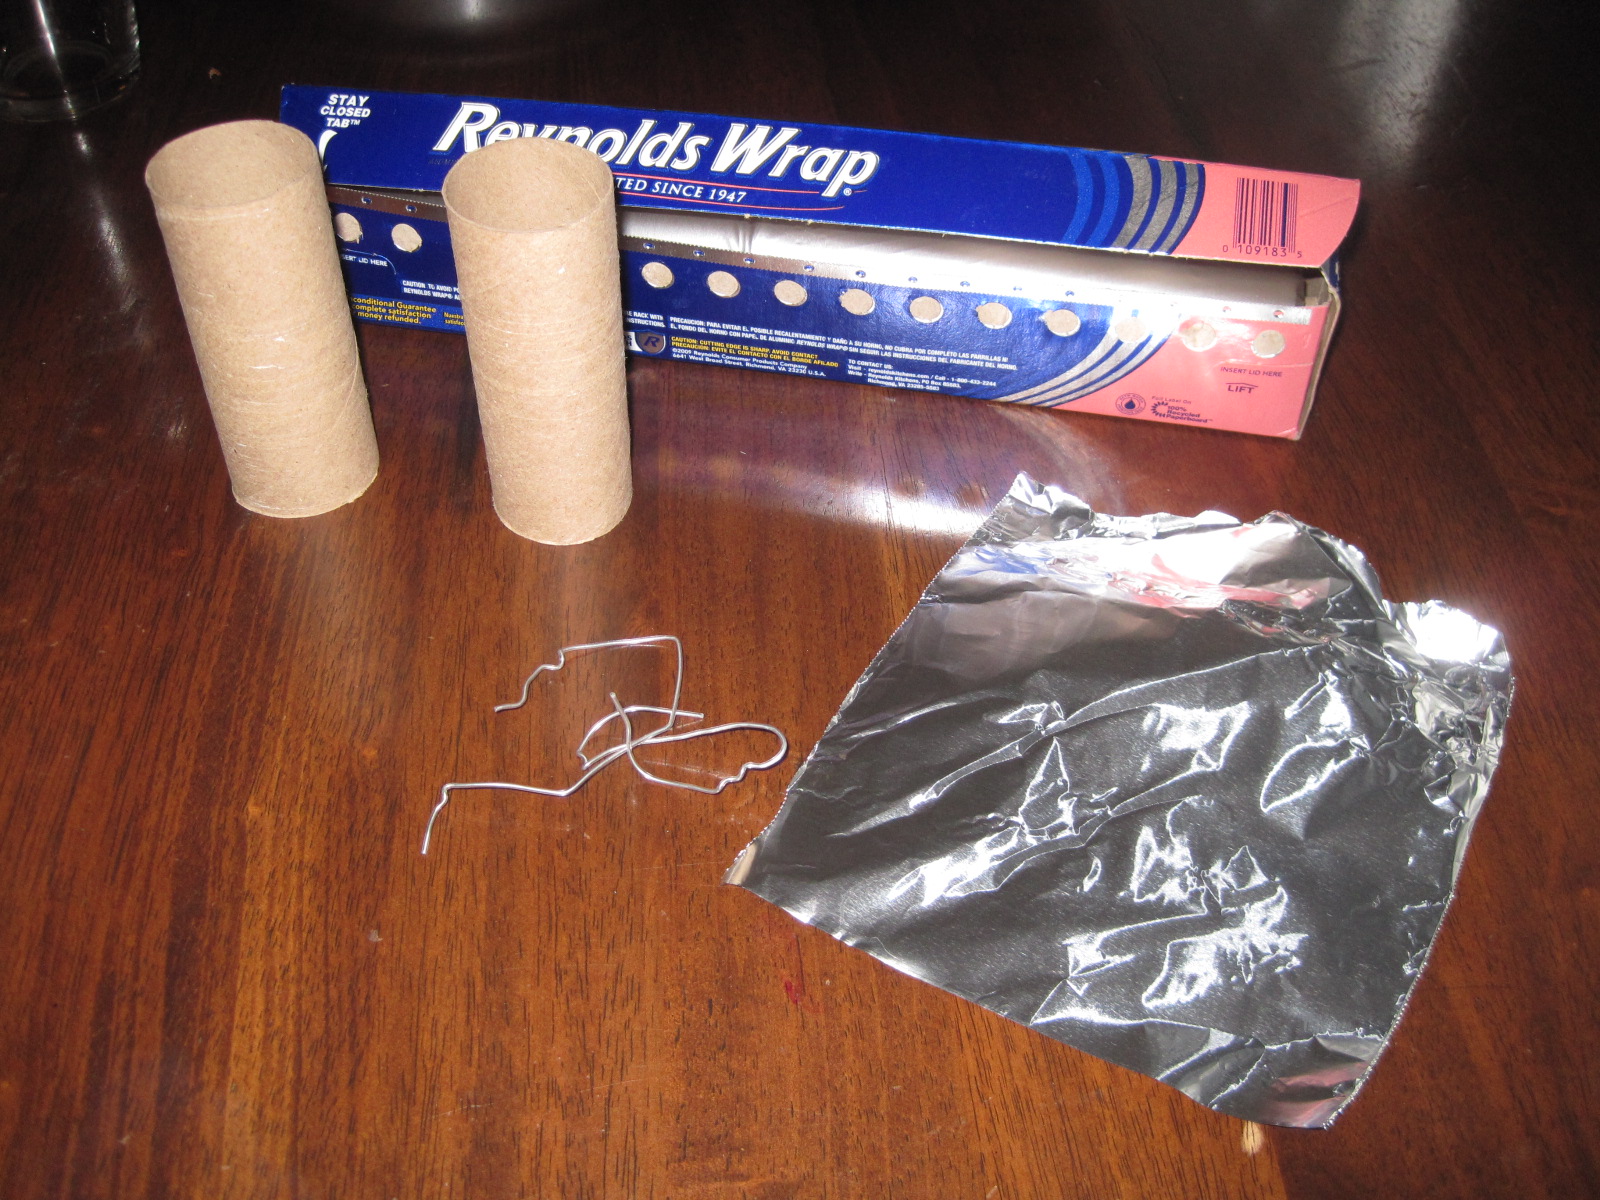
What You Need:
  • Toilet paper tube 
  • Aluminum foil 
  • Glue 
  • Googly eyes 
  • 2 or more pipecleaners (I prefer alien green color)
  • Needle nose pliers or tweezers
  • Twist ties (leftovers from packaging are great!) 
  • Optional:  large needle if your pliers/tweezers are not sharp

Why I Like This Craft:
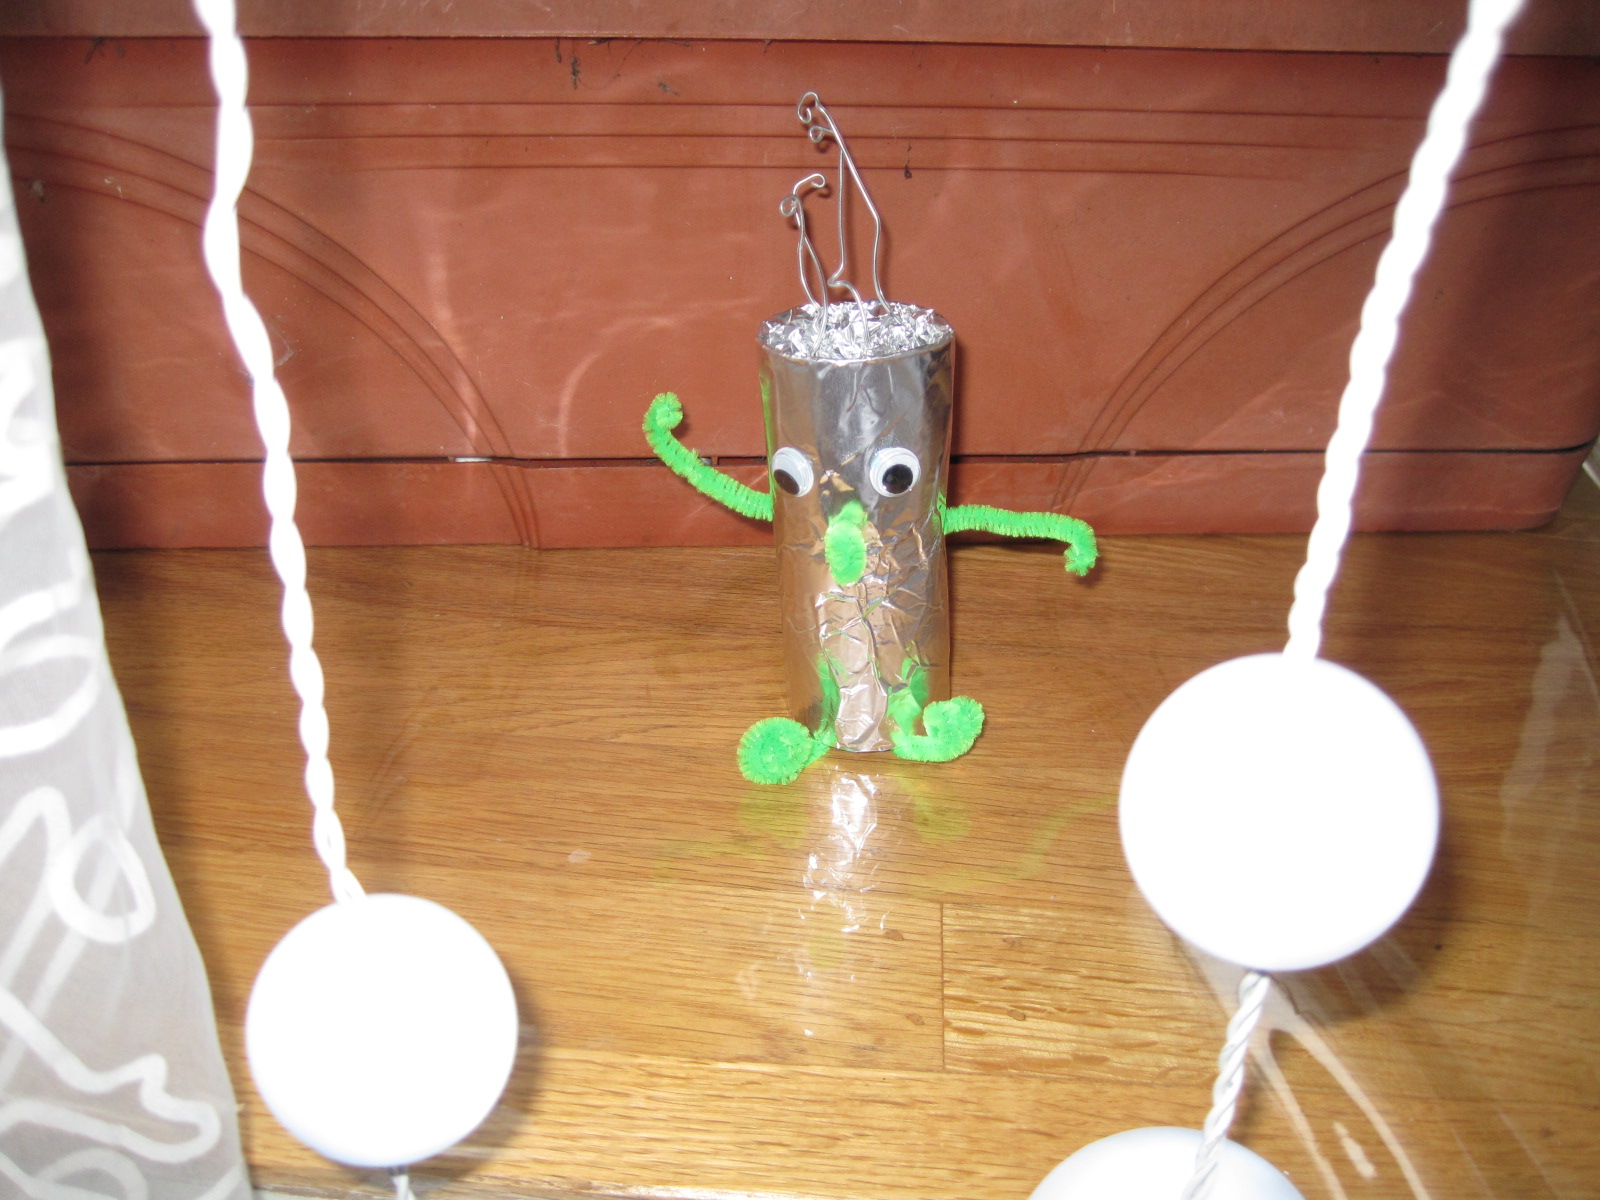
Ah, the maleable properties of metal make for easy assembly.  My three year old has actually played with this little alien critter quite a bit.  The legs and hair fall off, but it's easy to just pop them back in and pinch the foil around it so it stays put without tape or glue.

Step 1:
Measure a piece of foil a few inches longer than the width of your toilet paper tube and tear it off.  Roll the tube in the foil and scrunch up the ends of the foil and push them into both ends of the tube.  No glue or tape required.  This makes the body of your alien.  Next you will add arms, feet, a face, and hair. 

I realize the glare makes it almost impossible to see the scrunching at the end of the tube.  Sorry!
Step 2:
Use your needle nose plier snippers (or craft scissors) to cut one pipecleaner into three pieces.  These can all be the same length, or you can just have two that are the same and one that is shorter.  Two pieces will be used for the arms, one piece will be the mouth. Use the tip of the pliers to make a curly coil at one end of a pipecleaner piece for the arm, bending a bit at the other end in the hope that it will help it stay inside the alien's body.  Repeat for the other arm. 
Coil up the third piece almost to the end, leaving a centimeter or two to poke into the face. 
Top of photo: arm in the process of being coiled
Middle of photo:  uncoiled nose
Bottom of photo:  finished arm with coil at one end and
bend at the other to insert into the alien's body
 Cut your other pipecleaner in half to make bigger coils for the feet.  Make two if you want a standard alien.  Make three or four arms or feet if you want to make a funkier alien.  Poke the bent end of your pipecleaner legs into the bottom of the toilet paper roll.  Really push 'em in there so the alien sits flat and stays upright.


My alien was very embarrassed by this compromising photograph but eventually gave permission to post it
Step 3: 
Poke a small hole in the side of the alien's body about halfway down to insert your pipecleaner arm.  My pliers are not sharp so I used a large needle to start the hole so I wouldn't wrinkle the foil so much.  Slightly bend the straight end of the pipecleaner arm so it will stay in the hole.  The fuzzy part of the pipecleaner will help the arm stay put. 

Step 4:
Poke a hole with your needle or pliers into the middle of the area where you want to make your alien's cute little face.  Poke the little curled piece of pipecleaner into it and give it a tickle for good measure.  Aliens like tickles. 

See the nice little hole just waiting for a ticklish nose?
Step 5:
Glue on googley eyes above the nose. 

Eyes, nose and hair complete!

Step 6:
Use your needle nose pliers to make curly ends in your twist ties to make hair.  My twist ties were clear over silver colored metal and I kept the kinks in the middle left over from being used in the packaging.  Poke these straight into the top of the alien's head.

Now make some bleeping martian noises and have some fun!


Take me to your leader (toddler)!

Cereal Box Puppets & Masks

Even if you don't frequent a craft store you can still craft without fancy supplies.  You can make a lot of stuff with your computer printer and random materials sitting around your house or in a recycling bin.  I figured I would post this little craft, not because it's original - but because it can spark some other ideas what to do with reusable materials.  For these crafts I'm just using a cereal box and computer print-outs.  Did you know you can find hundreds of print-outs for your child's favorite characters on PBS Kids, Nick Jr., or Playhouse Disney?  These sites offer great craft ideas and plenty of coloring pages for your little ones.

Age: 1+
Mess/Cleanup: Just some paper scraps.  Nothing too messy.
What You Need:
  • Cereal Box (or any flat board, styrofoam, carboard, poster board, foam board, or oak tag board)
  • Computer Print-Out or Coloring Book Page(s)
  • Popcicle Sticks (for puppets)
  • Elastic Bands (leftover from birthday hats) for masks
  • Glue Stick
  • Hot Glue
  • Scissors
  • Crayons/Markers
Why I Like This Craft:
I use cereal boxes for everything.  Anytime I need to reinforce paper, I dig through my paper recycling bin and pull out some flatboard.  It's pretty easy to make, fairly sturdy for play, and I don't feel too guilty when it ends up in the trash.

Step 1:
This isn't rocket science, but here you go!  Flatten out cereal box.

Step 2:
Rough cut around characters on print-out (we used Team Umizoomi printables from Nick Jr.)

Step 3:
Using glue stick, adhere print-out to cereal box.
Step 4:
Cut out character.
Step 5:
Using hot glue gun, attach character to popcicle stick.  Or to make a mask, punch 2 holes on either side of face and tie on elastic band.
This is the impromptu costume we made for Chick-Fil-A Customer Appreciation day.
-Rose  @-}---

Thursday, December 23, 2010

Pretend Play Birthday Cake

My son got a wild hair tonight and he insisted that we throw a surprise birthday party for his toy ninja.  It's 8pm and 2 days before Christmas the last thing on my mind is to bake a cake for a toy ninja.  However, I was more than happy to craft a cake.  I've been saving a KFC bucket for a few weeks waiting for some inspiration.  Finally that inspiration has come!  Melissa & Doug make an adorable pretend play birthday cake, here's my homemade (built with a 4 year old) version that also doubles as a birthday cake hat!
The ninja blowing out his birthday candles.
Age: 3+
Time: 30 minutes +
Mess/Cleanup:  This isn't too bad. It's a let messier than making a real cake. It all depends on the materials that you use.  If you use glitter and glue, except a bit of mess. 
What You Need:
  • KFC Bucket
  • 2-3 sheets of White Paper (to help hide the KFC logo)
  • 2 pieces of 8x10 felt
  • Tape
  • Scissors
  • Various colors or self-adhesive felt, like this (for cake decorations)
  • Various self-adhesive foam stickers, like this (for cake decorations)
  • Scrap pieces of cardboard or styrofoam
  • Glitter and Glue (to make sparkly candles)

Why I Like This Craft:
My kids love playing in their pretend kitchen with all of their fake food.  I think this birthday cake is an adorable addition.  If we spent a little more time on the cake decoration and if my son was a little older, this could look store bought and would hold up to lots of play.  Plus, I love that it doubles as a hat. 

Step 1:
Cover the chicken bucket with white paper and then the felt.  I used the white paper to help cover the logo on the bucket.  I applied the white felt over the paper and taped it to the bucket.

Step 2:
Cut a few strips of cardboard or styrofoam to fashion some candles.  Invert bucket and cut a few slits in the bottom of the bucket so the candles can be inserted into the slots.
Step 3:
My son loves to use my expensive glitter.  So we decided to make the candles sparkly.  We covered the cardboard strips with glue and applied glitter to both sides.

Step 4:
Cut some flames out of the cardboard and covered both sides with yellow felt.  And to use the glitter again, I ran of bead of glue around the edge of the flame and my son dipped it in orange glitter.
Step 5:
Cut a little notch out of the flame so it can fit over the candles.

Step 6:
Decorate your cake with jewels, felts, markers, paint, etc.  We used only self-adhesive felt, so the cleanup was pretty easy.

Step 7:
Sing Happy Birthday to the Ninja and enjoy!  And since the bucket is still open you can use this a birthday cake hat (or you can buy one like this).  How fun (or silly)!

Enjoy!
-Rose @-}---

Tuesday, December 21, 2010

No-Bake Cookie Lollipops

I have lots of leftover candy and goodies from making our gingerbread houses.  I've been trying to think of something to make that could also serve as a kid-friendly addition to my cookie giveaways.  So this is what we made with the panty of treats.  It's pretty elementary, but effective for a 4 year old and tasted good enough for my toddler.  Next time I make these, I think I will spend a little more time on the design, maybe sans-kids.
I think this kind of looks like someone with a ski cap on.
Age: 4+
Time: 30 minutes +
Mess/Cleanup: All of these kitchen activities are always messy!  Sorry!  The final product is pretty cute though.
What You Need:
  • Vanilla Wafers (like Nilla Wafers)
  • Popcicle Sticks or Red Vines Licorice (I think popcicle sticks work much better)
  • Candy Melts or Chocolate Chips (I used Wilton Candy Melts with great results)
  • Sprinkles
  • Waxed Paper
  • Empty Ketchup or Mustard bottle, like this.  I bought mine from the dollar tree.
  • Cookie filling.  I Googled for some filling recipes, and came across this one from Martha Stewart.  I made a blackberry version.  It's pretty yummy.  You could also just use peanut butter or PB&J.
  • 4 year old ham optional
Why I Like This Craft:
In full disclosure, my son was only interested in this cookie craft for about 15 minutes.  He was over-tired and over-sugared (darn Christmas cookies!).  However, I think the final pop came out pretty good.  It took me a while to figure out a simple solution to applying and decorating the pops.  Next time I make these I have a plethora of ideas -- like maybe little snowmen heads?  little Santa faces?  Or for Halloween, cute pumpkins?

The blackberry filling was a hit with everyone.
Step 1:
Smear filling on cookies and sandwich 2 wafers together.  I think it's easier to make all of your cookie sandwiches first before proceeding to the next step.

Step 2:
Melt chocolate according to package instructions.  Be patient.  Melt the chocolate slowly.  Pour melted chocolate into the empty ketchup bottle.  This will make it whole lot easier to apply the chocolate.  I also found this "bottle-technique" much more kid-friendly than using baggies to apply icing.

Step 3:
Insert popcicle stick or licorice.  Using bottle, run a bead of chocolate around the sandwich.  Dip into sprinkles. 

Step 4:
Draw a little smiley face and place on waxed paper to dry.

Variations:
  • Snowmen - how cute would this be with a little black hat, coal eyes, carrot nose, and a scarf?
  • You can buy orange candy melts and make these into little pumpkins
  • Maybe some elves?  Add a little red and green hat made out of a fruit roll-up?
  • Decorate like Easter eggs
  • Use different color candy melts and color a beach ball
-Rose  @-}---

Friday, December 17, 2010

Really Tasty Edible Play-Doh (Marshmallow Fondant)


A number of months ago I came across this recipe for marshmallow fondant.  It's so easy to make and you can make a ton of edible decorations.  The possibilities are endless!  Today I decided to create some snowmen and a tree to add to our little Candy Cottage


Our little snowman.
My Lala Loopsy Cake (with oozing strawberry filling)

Age: 3+ (but Moms and Dads can use this recipe to be the rock star and make super cool cupcakes that look like they came from a bakery)
Time: 15 minutes to make the fondant + play time
Mess/Cleanup:  Oooh.  This is another messy craft.  My son, daughter, and I were all covered in powdered sugar!
My toddler didn't enjoy playing with the fondant, but she loved the powdered sugar!
The aftermath!  My pants didn't look much better.


What You Need:
  • 1 package of mini marshmallows
  • 1 teaspoon of mint extract (optional)
  • 4 tablespoons of water
  • 2 pounds powdered sugar
  • Food coloring
Why I Like This Craft:
You can use this fondant for anything!  I decorated my son's Buzz Lightyear rocketship birthday cake by simply by rolling out the fondant and placing it over the cake.  My son played with the "dough" for about an hour.  My daughter just licked the sugar off the table and ate any piece of fondant in sight.  At least it was an activity we could all do together.

Step 1:
Follow these directions from AllRecipes.com.  I do not use any butter and I chose to use mint extract.  It comes out very tasty!  I've also used almond, vanilla, and cherry extract at various times.  All good choices, but mint is my favorite.  I do not recommend using large marshmallows or Marshmallow Fluff.  The texture and taste does not come out the same.

Step 2:
Knead in colors.

Step 3:
Play!  The fondant will not harden.  If you plan on contructing anything, you will need underlying support.  We used large marshmallows, various candy pieces, and toothpicks for a skeleton.
It works just like Play-Doh.  Only it tastes much better!

To make tree, cut out 3 circles - small, medium, large.  Have 2 large marshmallows and a toothpick on hand.
Over each marshmallow, place the fondant.  For the top tier- roll a little ball of fondant and stick on toothpick.  Arrange smallest circle of fondant on top. 

Our little tree.

Variations:
These can make great cupcake toppers!  At Halloween I made these cupcakes by overlaying a circle piece of fondant on a large marshmallow.  Then we just used an edible marker to draw the eyes and mouth.
I used cookie cutters to help with my letters and stars for the Wonder Woman cake.
This was my first attempt with using marshmallow fondant. I used Fluff in this trial.  It came out too oily, that's why I recommend mini marshmallows and lots of powdered sugar.


-Rose @-}---

Graham cracker gingerbread house

This little edible house is a super fast activity.  We made this right before bedtime because the graham cracker house my daughter made at pre-school that day got squished on the way home and the poor little dear was sobbing over the crushed mess in her backpack. 


Time:  10-15 minutes
Age:  2-3+
Mess/Cleanup:  5 minutes for a simple house like this one
  • What you need: 
  • Graham crackers
  • White can of frosting
  • Candy for decorating
  • Optional:  Santa hats for Halloween pumpkin and your kid
Substitutions/suggestions: 
Use whatever food you have on hand.  We had half a bag of peanut M&Ms left over from Halloween and some rainbow sprinkles.  I planned to use some candy canes but didn't need them.  Pre-school used raisins and banana chips. 
You could also just buy one of those gingerbread house kits.  I got the mini village this year and it is terribly cute!!!! (See photos at the end)

The holidays all blend together these days
Step 1:  Crack your graham cracker into pieces for the walls. 


Next time I might make the house square for added stability but this worked fine.  You could add an empty milk carton or juice box to the middle to make it stronger, too.
 Step 2:  Put frosting on the edges of the biggest graham cracker pieces and stick 'em all together to make four walls

Step 3:  Snap another big graham cracker in half, dab some frosting on the edges, and make a pointed roof.  Note:  My roof slipped several times because I had too much frosting, but it stayed put after a minute.


This odd little scrap of broken graham cracker became a tree on the side of the house
 Step 4:  Add candy!  Still-sniffling daughter wanted "lights" on her house so I improvised with the forlorn, forgotten Halloween M&Ms.  Silver non-pareils would also make fantastic lights.  The squished graham house was soon forgotten. 


You might need to eat some of the M&Ms that don't fit the color scheme ;)
 Warning:  The roof on the finished house became quite lopsided overnight, so if you want this to last use a milk carton or something else inside the house to keep it up.

And here is the sad little house that prompted this whole activity.


The annihilated graham cracker house from pre-school. It was entirely too healthy, anyway. Building materials should be bad for you! This is jelly and raisins and bananas!  Pshaw!

This is the Wilton gingerbread village kit with extra Nerd rope, candy canes, Andes candies, Red Vines and peppermint swirl kisses
-Nancy

Thursday, December 16, 2010

Sugar Wafer Candy Cottage

This is really just a variation of a gingerbread house.  I usually make our houses out of graham crackers, but thought I would do something a little different this year.  This little cottage looks like a mess of icing of candy.  But that's ok, it tastes good and my son and I had lots of quality time building it together. I had to resist my obsessive tendencies and remember this is his project too :)  He thinks it looks like Candy Land.  I couldn't agree more.
Time: 1 hour +.  We ran out of ingredients so did this over the course of 2 days.
Age: 3+
Mess/Cleanup:  Ugh.  This is so messy with royal icing.  Cleanup is not fun.
What You Need: (House Structure Only)
  • Sugar Wafers (1 large pack)
  • Empty Cereal Box (we'll use the flatboard to build a template)
  • Serrated Knife
  • Baggie (I like the 1 gallon baggies with no zipper)
  • Pretzel rods
  • Candy assortment
  • Royal Icing
    • With mixer, whip 2 egg whites with 2 teaspoons of lemon juice
    • Add 3 cups of sifted powdered sugar
    • Blend until smooth
    • Transfer icing to baggie and snip off corner to use as piping bag. I originally used a baggie to pipe the icing - however, I later found out that filling a reusable (empty and clean) ketchup container was MUCH easier and cleaner. 
      My son loves the sifting part!
      

Why I Like This Craft: 
Candy. Tradition. Candy.  Lots of time with my preschooler.  What's not to love?

Step 1:
Flatten out the cereal box.  Find your inner architect, and sketch 2 sides to include the pitch of the roof and 2 rectangle sides.  You may want to measure some of your ingredients (e.g., we made a roof from pretzel rods, so in the design I had to make sure the rods were the length of the rectangle) to ensure everything will fit together properly. 

I'm typically not much of a planner, but this little step made things a whole lot easier and saved us  a lot of mess.  If your flatboard pieces can fit together, so will your finished house.
Not a very exciting part of building.  Darn prep.
Step 2:
Resist eating the sugar wafers.  We only had 1 left after this step!Lay out your wafers in a subway tile pattern on each of your templates.  Using the knife, trim the wafer so it fits to the template.  This is to dry fit all of the pieces so assembly will be quick.

Step 3:
Bring out your icing.  Using it as "glue" for the "bricks", squirt some icing on 3 sides of the wafer.  Pick up your wafers in order of your template.  We started with the bottom left on each side.  Adhere wafer to your base.  The royal icing is pretty strong.  It will harden when dry. 

Step 4:
Once the sides are fairly dry (we waited overnight) you can attach the roof.  We used pretzel rods.  I ran a bead of royal icing (I had to make another batch) on all sides.  My son loved building the roof.  He said he was just like Handy Manny.

Step 5:
Decorate with your candy assortment and enjoy nibbling on your house!

-Rose  @-}---