Thursday, January 27, 2011

Action Figure Paper Dolls - Iron Man

I've created a crafting monster out of my 4-year old ever since we started this blog.  Lately, every night he's been asking what kind of craft we'll be making.  This evening I had a bunch of craft supplies out on the table and he decided he wanted to make an Iron Man.  He ran up to his room to get his action figure and promptly began to trace him.  I grabbed my camera and this is how craft evolved...Iron Man (or any action figure) paper dolls.
He's very proud of his paper Iron Man
Age: 3+
Time: 20+ minutes
Mess/Cleanup: Just some paper scraps.  5 minutes (though my dining room table is still covered with the aftermath)
What You Need:
  • Big Action Figure (we used his 10" Iron Man)
  • Pen
  • 1 sheet of Construction Paper (Red for Iron Man)
  • 1 small sheet of Oak Tag or other stiff paper or flat board
  • 1 Self-Adhesive Jewel (for Iron Man's core)
  • Self-Adhesive Glitter Foam (I really love this stuff. I have found so many uses and it really makes cleanup easier.)
  • Scissors
Why I Like This Craft:
We were just set to settle into the evening of Nick Jr. and Sprout when my son decided he really wanted to do a craft.  I couldn't deny his creativity, so off we went.  The 30 minutes making Iron Man was far better than 30 minutes in front of the TV.  Plus, I think my son had a really good idea.  Paper dolls aren't just for girls.  Heck, sometimes it's hard to think of boy crafts.  He's not all that interested in making tissue paper flowers or hair bows.  I'm glad he thought of this.  He has already requested that we make Batman next. 

Step 1:
Lay out action figure on oak tag and trace.  My son did trace most of this and I was really surprised at how well this worked.  The outline comes out pretty decent.
Step 2:
Cut out shape.

Step 3:
Trace action figure on construction paper to make a "suit".  For the Iron Man novices, in Iron Man 2 he has 2 suits.  We decided to make the red one.
Step 4:
Cut out suit.  When cutting out the suit, be sure to leave some "tabs" so they suit can be folded over the oak tag body.  I did help my son with the cutting of the suit.  I'm sure the tabs would have been snipped off.
Step 5:
Decorate the suit.  We used a jewel for his core.  I also cut up some of the glitter foam to make a helmet and some leg pieces.  Ok, I know this looks a little rough.  But for a 4-year old, this is awesome.
Our decorations are slim.  Bedtime was approaching.
Step 6:
Enjoy your happy kid!

-Rose  @-}---

Sunday, January 23, 2011

Puppy Dog Valentine Bags

Since Nancy is already in the spirit of Valentine's Day, I figured I better catch up.  I've been checking out the latest Oriental Trading catalog for some craft ideas for some time, and thought today was as good as any to test one out.  I had my son go through the catalog and pick out some crafts he was interested in and I would attempt to duplicate it.  Here's our little valentine holder we made today:
Sorry, smiles not included :(

Age: 3+
Time: 15 - 45 minutes.  I pre-cut all of the pieces and just had my son assemble the puppy.  It only took about 10-15 minutes. However, my son told me that this craft was too quick.  If you have little ones that can easily cut out the pieces, you might want to reserve some of the cutting for them.
Mess/Cleanup: I chose to use a stapler and a glue stick, which greatly reduced the mess.  We just had some felt scraps to clean up.
What You Need:
  • 1 paper plate
  • 1 brown paper bag
  • 1 piece of light brown felt/construction paper/craft foam
  • 1 piece of dark brown felt/construction paper/craft foam
  • 1 small piece of red felt/construction paper/craft foam
  • 1 small piece of black felt/construction paper/craft foam
  • 2 large googly eyes
  • Black marker
  • Scissors
  • Stapler
  • Glue
Step 1:  Cut out all of the pieces
  • Here are the pieces you need to cut from the felt, construction paper, or craft foam:
    • 1 red heart (eye patch)
    • 1 black heart (nose) 
    • 1 large oval (head)
    • 2 bean shapes, light brown (front paws)
    • 4 ovals, dark brown (eyes & back paws)
  • Here are the pieces you can cut from the paper plates
    • Cut the inner circle of the paper plate
    • Cut a name tag and mouth

Step 2: Write Name on Tag
Have you little one write their name on the tag.  Using the black marker, I edged the tag to make it stand out a little more.


Step 3: Assemble the pieces
Here are the pieces laid out on the paper bag.  We used a stapler to attach most of the pieces, and a glue stick to adhere the eyes and tummy. I did add a little detail to the mouth using the black marker.

Attach ear to head and staple both pieces to the bag.
I added little "x's" to point out where the glue should go for the front and back paws.

Glue on the the eyes.

That's it.  We're all ready for our Valentines!


-Rose

Crayola Color Explosion Marker Replacements

This is just a little tip for those of you with Crayola's Color Explosion sets.  This morning my son was adamant about coloring in his color explosion book, but our "color-revealing" marker was dried out.  In efforts to avoid a mid-morning meltdown and a trip to the store, I tried one of my tricks and thankfully it worked!  Did you know you can use plain old white vinegar?  Well, you can!  I just poured a little vinegar in a cup and brought out the paint brushes.  I'm sure you could also dip your existing marker in the vinegar.  He then just painted on the pages and the color finally exploded! 

Edited to add:  It's now 30 minutes post craft - and the vinegar really dissolved the black overlay.  Unfortunately both of my kids are stained blue.  I now have to Google how to get the "paint" off of them.  Any suggestions?  So, use the vinegar sparingly and watch your kiddos closely :)

-rose

How to make a Valentine garland

I wanted to make some fancy, twirling valentines for my windows. 
It's pretty.  It's frilly.  It's happy!  What other reason need there be?
Make some valentine garlands for your house and be your own valentine :)

Age:  2-99

Time: 1 hour to 5 hours (I take my valentines very seriously)

Mess/Cleanup: Minimal mess if you work quickly.  I made a long-term mess by spending three days on this craft.  It's less messy if you use more stickers and tape than glue. 

What you need:
  • Paper-I got pink and red patterned card stock and paper from the scrapbook section (actually it was all my own stash) 
OR___skip the paper and buy some cute heart doilies and/or heart shaped die cuts  (for you non-scrapbookers out there die cuts are pre-cut paper shapes sold in the paper crafting section of craft stores)
  • Valentine themed and flower die-cuts, clip art printouts, or hand cut hearts
  • Pen or pencil for tracing
  • Scissors
  • Glue
  • Stickers-I got valentine borders and shimmery hearts
  • Double stick tape
  • Yarn-I used whiskery red silky yarn entwined with this really cool black colorful stuff that I had left over from another project.  Use dental floss if you have nothing else on hand. 
Optional: 
heart cookie cutter stencil 
anything else you have around to embelish your valentines

Don't know why this photo won't rotate.  Here are my cookie cutters and some hearts I cut, die cuts, and valentine border stickers
Overview of Instructions
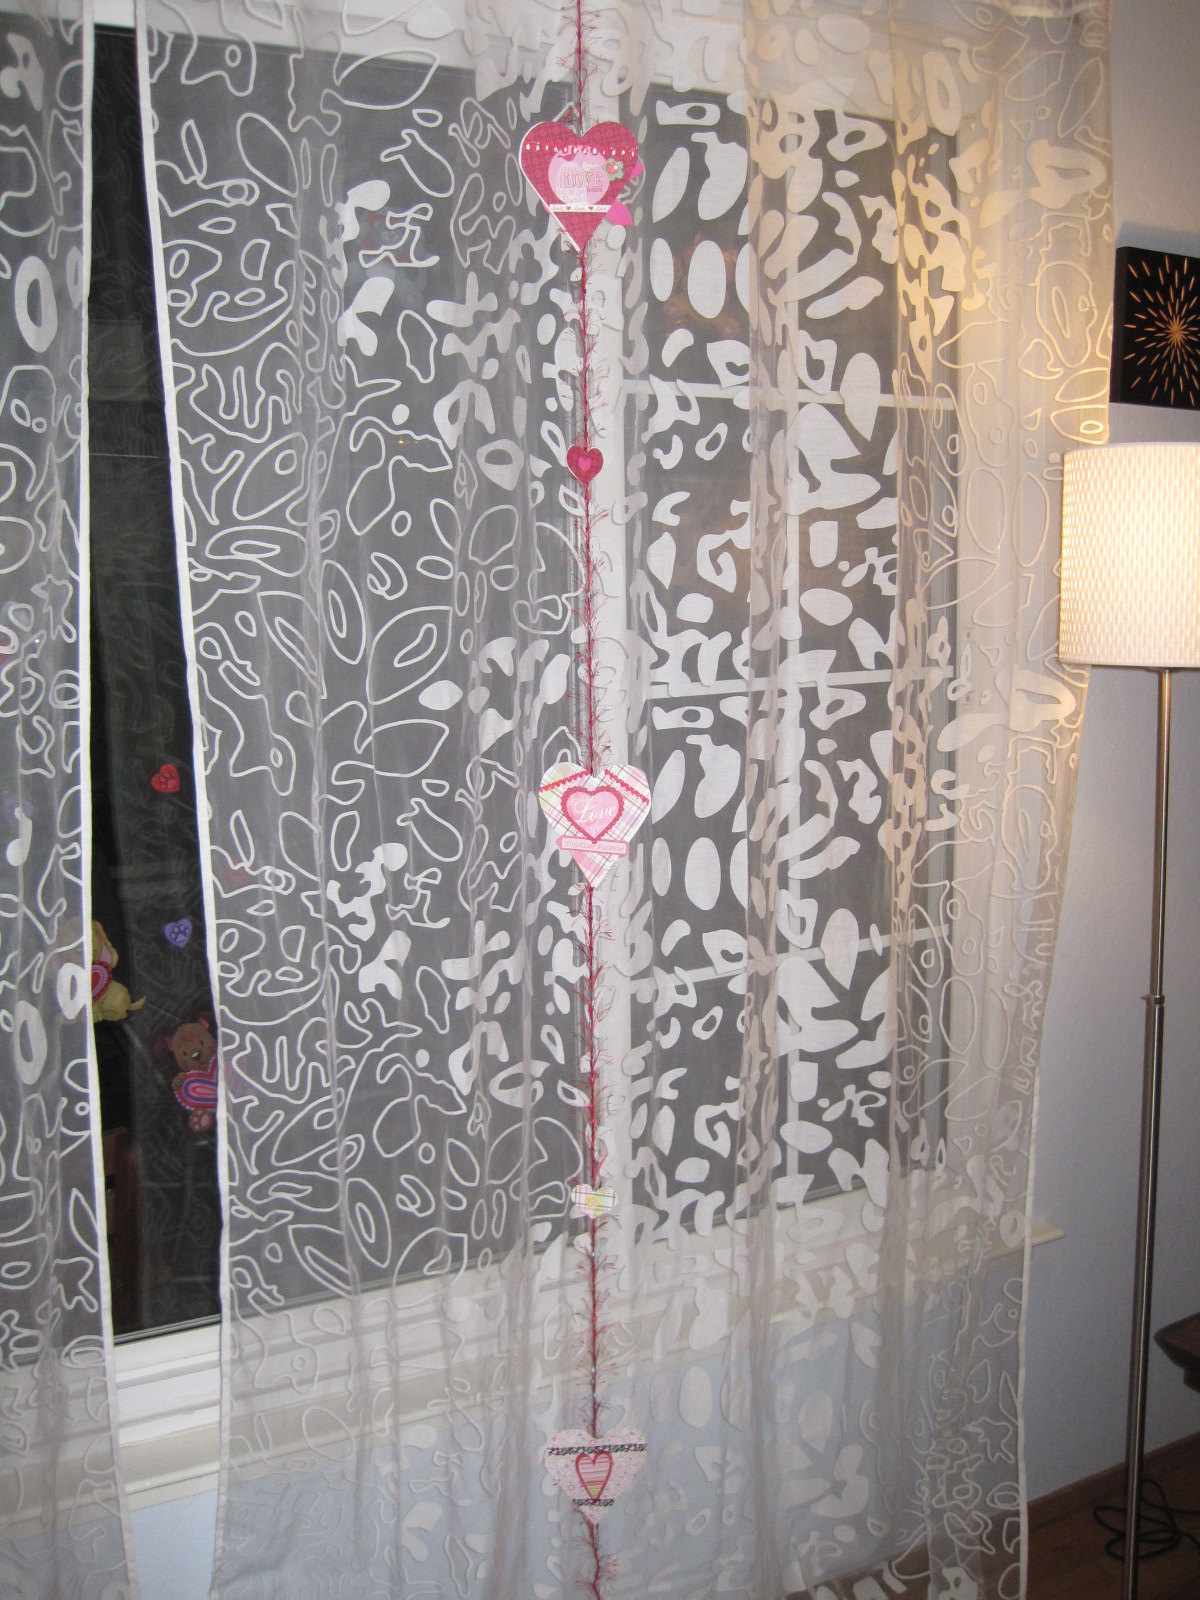
Cut out a bunch of hearts, decorate them, and tape them to your yarn to make a garland.  Hang your garland vertically from a curtain rod, or drape it or tack to a wall, depending on the space you're decorating.

Detailed instructions  
Step 1:  Plan the number of hearts you'll need. 
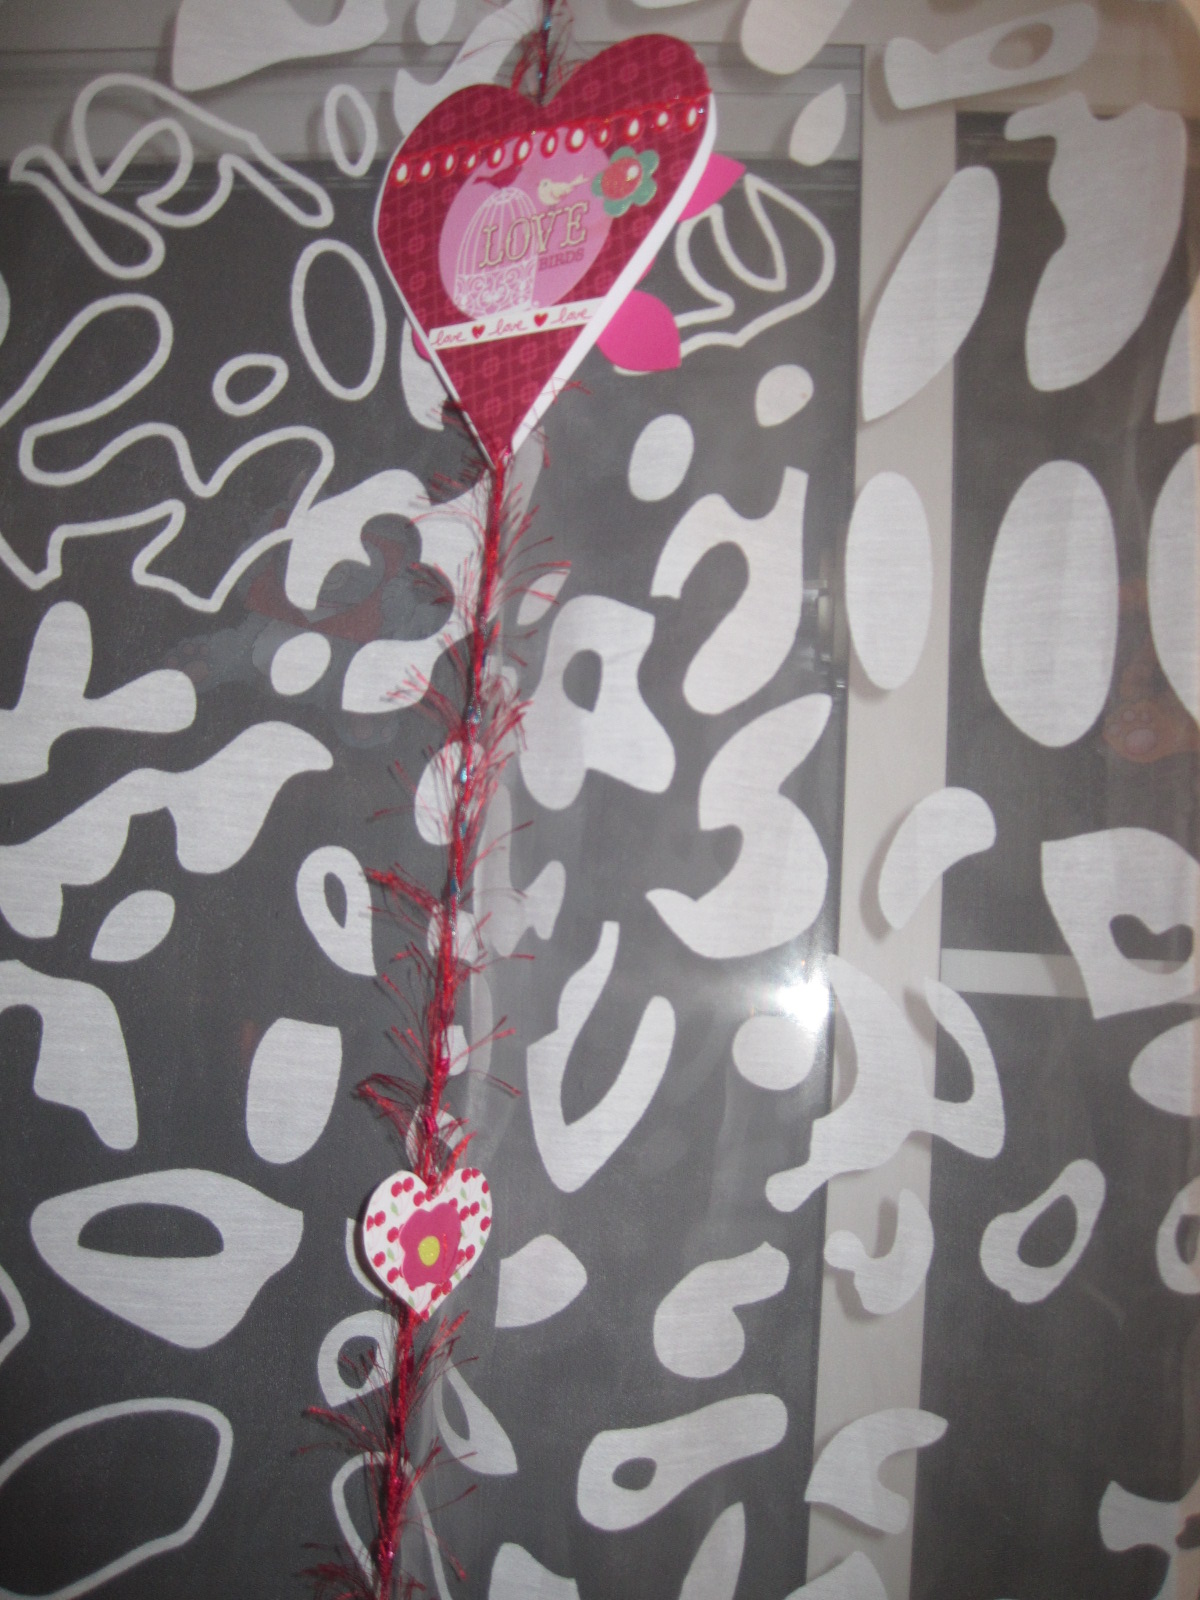
The number of hearts depends on whether you make double sided or single sided hearts. For double sided garland I planned to decorate each heart on one side and tape it to a matching heart, sandwiching a piece of yarn in the middle.  However, I had some really cute card stock printed on both sides, so a few of the large hearts are single sided and decorated on both sides.  So, I would need 36 large hearts to make 18 large sandwich hearts, and 24 small hearts to make 12 small sandwich hearts.  Check out the first photo to see the end result.  The yarn shows up on the single sided hearts but otherwise you can't really tell the difference because I used double sided card stock.

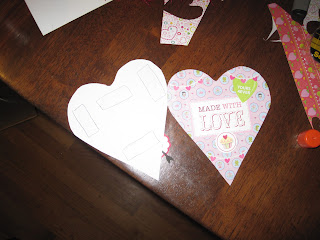
Step 2:  Trace and cut out your hearts. 
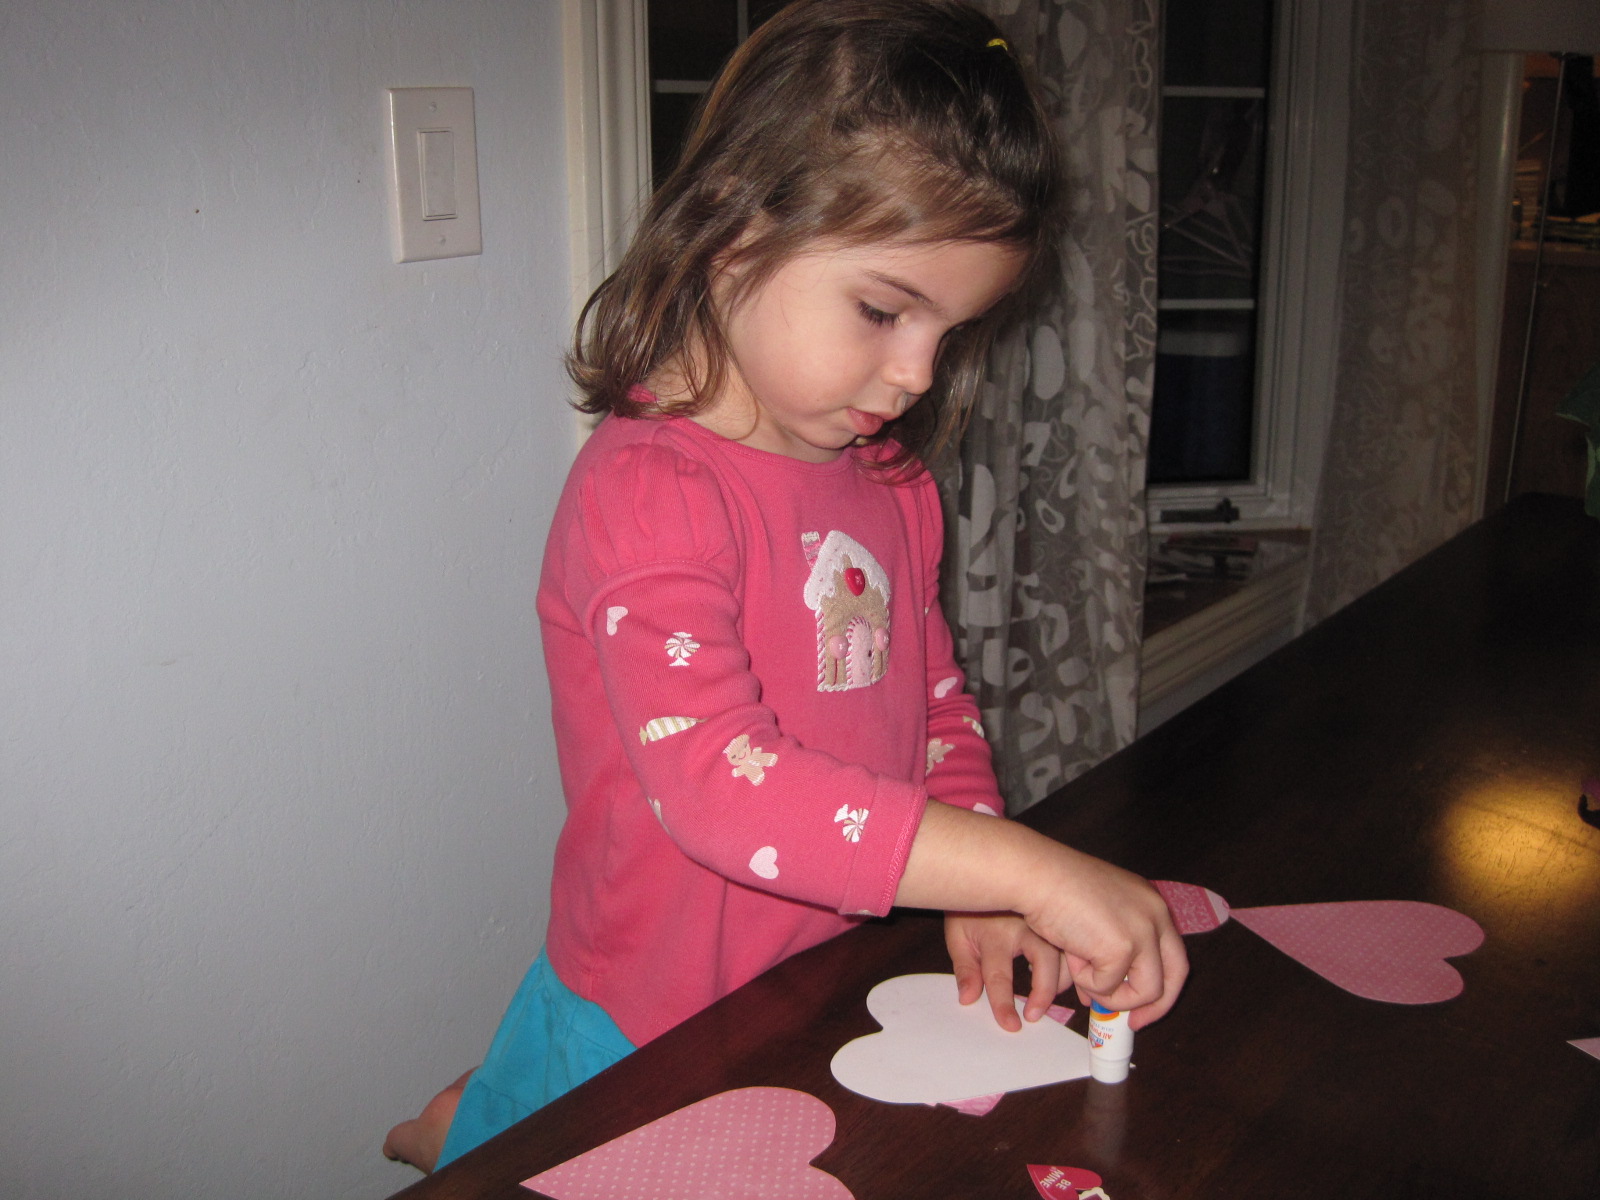
I used a large and a small heart cookie cutter as a template and a pen I snagged from a hotel on a business trip to trace my hearts.  You could also cut your own stencil from cardboard, or just cut out two hearts at one time and keep track of its mate.  Variety is the spice of life.  I added more small hearts because I had scraps that I considered too large to throw away :)

My three year old did a decent job of tracing inside the heart cookie cutter but did Zero cutting.  You will probably have to do most of the cutting work if your kid is 4 or younger. 

Trace on the back of your paper if you are using fancy printed paper
Heck, since half the fun of this project is going to the craft store to buy cute valentine stuff, buy some pre-cut heart die cuts or doilies and skip this cutting step altogether. 

Step 3:  Decorate your hearts.
Go crazy with your glue stick, die cut embelishments, stickers, and sticker borders.  My three year old did a great job without much instruction other than me frantically saying  "No! No! Don't stick all of the die cuts on top of each other!!!  You need to see each one!"  (because each one costs around 30 cents!)
Some ended up upside down.  Who cares.  It is cute if a three year old does that.  If you do it by accident, blame it on the kid. 

Step 4:  Assemble the garland.
I wanted vertical strands of garland, so I tied my yarn to the curtain rod, dropped the ball o' yarn to the ground and cut it a few inches above the floor.  (Yes, I realize it is the perfect height for my cat to attack.  But my cat is old, so I hope the garland will survive a few days.)

After the yarn is hanging use double stick tape (or glue stick) to smack two matching hearts together around the yarn and space at intervals that appeal to your well trained eye.  If you are making a swag-style garland you can stretch out your yarn on a table or on the floor. 


My large hearts don't quite match because I used a cheap 8 year old Ikea cookie cutter template that bent every time the pen touched it.  Small hearts match much better because the cookie cutter was a more stable template.  Who cares, both hearts are frilly and pretty.
If your kid (or you) got sick of making hearts before you reached your target, slap a piece of regular tape to one side of a heart to attach it to the garland and hope the thing doesn't spin too much when your heat comes on to show the plain old boring back of your fancy valentine.  You could also use a big heart sticker to attach the heart to the yarn to stretch out your heart supply and have both sides look reasonably cute. 

If you have big hearts make sure you use a lot of double stick tape, or glue stick.
Clear tape doesn't photograph well so I drew rough rectangles around each piece of tape to show how much I used on the large hearts. Hope you can see past the glare.

Now step back and admire your handy dandy valentine garland!  And tell your three year old with the oral fixation not to eat the darned things!  Paper is not food. 

One strand down, five strands to go

Monday, January 17, 2011

How to Make Care Bear Cupcakes

My mom and I spent the day doing a little retail therapy.  At Ross I found a fantastic collapsible cupcake holder.  I'ver been eyeing similiar ones for months, but didn't want to cough up the $30.  So today I found this awesome one for $20 - I was sold!  This evening I was inspired by the Care Bears movies my kids and I watched last night and attempted to create a cute Care Bear cupcake.  Remember, I'm not an artist or a pastry chef and I'm sure most of you could do a much prettier job.  This is just to give you an idea of what you can do.  Most of it is easier than you think.

OK, the rainbow is a little ugly -- but lesson learned for next time.  Use piping gel or icing for a cleaner look.
Age: 8+. I made the cupcake and my kids watched and enjoyed licking the icing off of the utensils.
Time: About 4 minutes per cupcake.  But if you do an assembly line, it would be much quicker.
Mess/Cleanup: Surprisingly clean.  I did not mix any icing colors and used store bought icing.  I just had a few knives, spoons, and sticky kids to wash up.
What You Need:
  • Cupcakes.  I used a white cake mix, but substituted applesauce for the oil (1-1).  I also added about 2 tablespoons of watermelon sugar sprinkles.  I wish I added more.  There was a slight hint of watermelon, but I think 4+ tablespoons could have made these super fabulous. 
  • Pink Icing (Betty Crocker makes a pink cherry icing that is pretty yummy)
  • White Icing
  • Mini Marshmallows (about 2 per cupcake)
  • Edible Color Markers (Red, Yellow, and Blue - like these)
  • White Candy Melts (1 per cupcake, like these)
  • Scissors
  • 1 Baggie (I like the non-zippered gallon size)
Why I Like This Craft:
Moms like to craft too!  Since our Buzz Lightyear cupcakes are such a hit, I wanted to try to make another character cupcake.  I happen to have much love for Care Bears (circa early 80s) and my daughter was the cutest Care Bear for Halloween, how could I not try to make this treat?
I think the cupcakes made her happier than wearing this costume!
Step 1:
Frost the cupcake white.
Step 2:
Add pink frosting to the baggie.  Twist the open end and squish all of the frosting to a bottom corner of the bag.  Snip a small corner off the baggie with scissors.

Step 3: Make the Pink body
Freehand a Care Bear head.  It's not that hard.  Really.
Step 4:
Add some arms and a belly.  You can use a toothpick to smooth out the squiggly lines of the frosting.

Step 5: Make the Nose, Chin & Eyes
Snip a mini marshmallow in half lengthwise.  Reserve the half for the nose.  Snip the remaining piece in half again (1/4 of the marshmallow).  Reserve one quarter for the chin.  Snip the remaining piece in half again.  You now have 2 eyes.  You may need to reshape some of the pieces to make them work on each cupcake.

Step 6:
With the nose piece, use the red food marker to make a small heart near the top of the marshmallow.  With each of the eye pieces, use the blue food marker to make a small blue dot.

Step 7: Make the Belly Badge
Using the color markers, draw a rainbow on the white candy melt.  My markers were a little dry.  I think if I had piping gel or royal icing on hand, I would have used that to make a much prettier belly badge.
Step 8:
Place the pieces on the cupcake to make the Care Bear's face.  Add the belly badge.  Voila!  In this picture I also added to little marshmallow bits for the ears.  I guess they're optional.
(Yes, I do need to learn how to use my camera.)
Step 9:
Enjoy the cupcakes!  Our, as my kids do, enjoy licking off just the icing and put the sticky cupcake on the couch.

 -Rose @-}---

Saturday, January 15, 2011

5-Minute Peek-A-Boo Bags

Today I broke out the melt beads (we have the Pyssla beads from Ikea) right after lunch.  My 4-year old loves the thought of doing melt bead crafts, but he doesn't have the patience or fine dexterity to really do this craft without a complete meltdown.  Very quickly our craft turned into an archaeological dig with him hiding tiny toys in the bin.  So instead of making the traditional coaster, keychain, or ornament we made a very simple Peek-A-Boo bag.  What's a Peek-A-Boo bag?  It's a little quiet activity that lets your little one find treasures hidden in a bag.  They can smoosh and shake the bag to uncover their lost items.  There are plenty of places to buy fancier versions or you can easily sew one together.  This is the preschooler-can-do-it-theirself version all in 5 minutes without sewing or glueing!

Age: 4+ (old enough not to open the bag and dump it all over the floor or car)
Mess/Cleanup: So NOT messy!  2 minutes cleanup, unless the beads get knocked over.
Time: 5 minutes + play time
What You Need:
  • Ziplock Bag (we used a quart size with a slider lock)
  • Beads (we used the Pyssla beads from Ikea, but you can also use any kind of pealer-type bead, pony beads, uncooked rice, or dried beans)
  • A variety of tiny treasures.  I had my son do a little scavenger hunt to find tiny toys and items.  We ended up with a penny, paperclip, tiny frog, super ball, foam triangle, and a car.  Anything you get from a little vending machine would work perfect.  Just make sure it's not pointy.

Why I Like This Craft:
I always like a craft that can double as an activity.  You can always add new treasures into the bag so the experience always changes.  You can make 2 identical bags and race who can find a selected treasure first. 

Step 1:
Find treasures and place in bag.

Step 2:
Dump a bunch of beads into bag.  Enough to cover and completely hide all items.
Step 3:
Zip it up and play!  Our tricky treasure was the paperclip.  It took my son about 5 minutes to uncover.

That's it!  It's really easy to turn Saturdays into a lazy day to watch TV.  Taking 30 minutes to get out from behind the TV and make a simple craft gives you a little more quality time with your kids.

-Rose @-}---

P.S. From Nancy:
We made some with black beans and it was fantastic! 
Stuff for the bags
Finished black bean bag

Thursday, January 13, 2011

Cardboard Shoes & Dino or Monster Footprints

Many thanks to Alyssa for her suggestion of making monster footprints.  As soon as my son came home from pre-school I told him about this pending project.  He was in love with the idea and couldn't wait to get started.  Right now my son is really into dinosaurs, so we decided to make T-Rex footprints.  After we completed the project, we took the cardboard cutouts into the snow and stamped some footprints.  My son hopes to scare our neighbors into thinking a herd of T-Rexs came stomping through our neighborhood :)  Too funny.  I love my 4-year old.

So, here you go...
Age: 4+ (however, as you can see - made made a tiny pair of dino-prints for my youngest)
Mess/Cleanup: Just some cardboard scraps
Time: 20+ minutes
What You Need:
  • Cardboard (We used a pizza box)
  • Yarn (or string or laces)
  • Scissors
  • Markers
  • Packing tape (It was getting close to bedtime, so we didn't use the packing tape.  But I was thinking to adhere it to the underside of the print so the cardboard wouldn't get wet in the snow.)

Why I Like This Craft:  It's so easy with only a few supplies!  Plus, my son thinks this is super cool.  It allowed us to do a little pretend play (which I'm sure there will be more time tomorrow to stomp around like dinosaurs) and give us another activity for the snow.  Also, as soon as my 20 month old got interested, I started thinking of all kinds of things to make -- little ice skates (this one's for you Erin), princess shoes, or monster feet. If you cover these with construction paper, glue, and glitter you can make some pretty cute little pretend play shoes.  Time was limited tonight, so it mostly was a mommy-craft with playtime by the kiddos.


Step 1:
Flatten out card and draw your footprint.  I drew what I think a T-Rex footprint would look like.

Step 2:
Cut out footprint and decorate.  It was pretty close to bedtime when we started, so I only had my son use some markers for decoration.  He was too excited to wear the footprints, so the coloring was short-lived.

Step 3:
Have your little one place his/her foot on each of the prints.  Trace the foot.  Poke 4 holes in the cardboard - 2 on each side of the foot.
Step 4:
Cut about 2 feet of yarn.  Thread the yarn through the cardboard.  I threaded it so my son's toes would go under the yarn.  I criss-crossed the yarn behind his heel, then tied them.


Step 5:
Stomp like a dinosaur!  We also tried this outside to make prints in the snow and it worked pretty well.  We made our prints pretty large, so it was a little difficult for my son to walk.  I had him take off his dino-feet and we just used the prints as very large stamps.

Too cute not to mention....
My daughter was throwing a fit that she didn't have a pair of dino-feet, so I made her little baby T-Rex feet.  These cut-outs that went over the top of her little barefoot feet.  How cute?  She was in love.  I have a feeling in the very near future we will be making some sparkly shoes or ballerina slippers using a similar technique.

-Rose  @-}---

Saturday, January 8, 2011

Imagination Movers Costume

On Facebook the Imagination Movers have posted this contest to win some VIP tickets to their upcoming concert.  If you do not know of the Imagination Movers, check them out.  It airs on the Disney Channel and is geared towards your preschooler.  I think their music is fanstastic and I always find myself singing or humming one of their tunes.  Here's a little video we created for our entry (my toddler is dressed as Nina):

Making the Mover's costume was pretty easy.  As soon as I heard about the contest, I moved into action.  First, here's what the Imagination Movers look like:

Age: Any age!
Mess/Cleanup: Very easy.  Making the name patch resulted in a few felt scraps.
What You Need:
  • Red Long Sleeve Shirt
  • Blue Short Sleeve Shirt
  • Blue Pants
  • Black Shoes
  • Red Felt
  • Yellow Self-Adhesive Felt
  • Glue
  • Red Plastic Tape (optional)
  • Mover accessories: Red baseball hat (Mover Dave), Cowboy hat (Mover Smitty), Wobble Goggles (Mover Scott) (or red sunglasses) (here's a cool link on how to make them), or Drum sticks (Mover Rich).
Why I like this Craft:
It's great for Halloween or anytime play!  My son wanted to sleep in his costume.  It only takes about 10 minutes to pull together.

Step 1:
Find a red long sleeve shirt

Step 2:
If you have a some blue coveralls, now's the time to pull them out.  But if you're like the rest of us, find a blue short sleeve shirt and pants.  We used my son's Superman pajamas.  I had him wear the shirt backwards.  You could also just turn a shirt inside out if you can't find a plain one. 

Step 3:
Making the name badge was pretty easy.  I cut an oval out of the yellow felt.  I then cut out the letters to my son's name out of the red felt.

Step 4:
My son used the glue to adhere his name letter to the yellow felt.

Step 5:
Stick felt name badge to shirt (this is why I used the self-adhesive felt).  Beware, pending on the type of felt you use it may use some residual on the shirt.

Step 6:If you want to add red stripes to the sleeves and shoes, just use some red tape.  I couldn't find my tape, so I just cut out some red strips of felt and used tape to affix them to my son's shoes.  I realize this is a minor detail - but my son was really excited to do a head-to-toe Mover costume.

Thursday, January 6, 2011

Importance of Play

While surfing Facebook, I came across this article:
I've read a number of articles on this topic, but this is the first one I've seen in awhile.  It inspires me to carve out a little more time for my little ones.  I think this week I'm going to concentrate on some crafts that involve pretend play.  Stay tuned...
 
-Rose @-}--- 

Monday, January 3, 2011

Make Your Own Rainstick

Ever since we started this craft blog, I've channeled my inner hoarder and have refused to toss any cardboard tube for fear that I would come up with a good idea and not have any cardboard tubes in sight.  During my post-holiday cleaning all of this craft clutter is driving me nuts, so I started to wrack my brain for something to build with the tubes.  This afternoon we made a pre-schooler friendly rainstick.  It came out ok.  It does sound like the rain if you tilt it very slowly.  But see the instructions below how to make this craft even better!
I know, this isn't pretty -- but remember I'm working with a 4 year old!
Age: 3+ (however my 20 month old already loves to shake this!)
Mess/Cleanup:  5 minute cleanup, unless you include the paint.  It took me at least 5 minutes to scrub down each kid.
Time: 30 minutes
What You Need:
  • Cardboard Tube.  We used a paper towel tube, but I think a wrapping paper tube would work much better.
  • Popcicle Sticks (or staight pins or toothpicks.  We used popcicle sticks since I was working with my preschooler)
  • Beans, Plastic Beads, Couscous, or Rice (We used lentils and couscous, but I think plastic beads would produce a better effect)
  • Masking Tape
  • Scissors
  • Hot Glue Glue/Hot Glue (if using toothpicks or popcicle sticks)
  • Paint and/or embellishments

Step 1:
Have an adult poke some slits in the tube.  I used a flathead screwdriver, but a sharp scissor would also work.  Following the the "roll line" of the cardboard tube, poke a slit about every inch or two.  You do not have to poke through both sides (for what it's worth, I did this and I think that overcomplicated the project).  If you are using straight pins, no need to pre-poke holes.  The more "obstructions" you create with the toothpicks, popcicle sticks, or toothpicks the longer it will take for your beads to fall through the tooth.  This will create a longer rainfall effect.


Step 2:
If using popcicle sticks, cut about 10 of them in half.  Poke the rounded end into tube (my son loved this step).  Have an adult trim all of the pieces so they are almost flush with the edge of the tube. If I do this craft again with an older child, I think I will use straight pins.  Much easier to press into tube and I think it would result in a better sound.
Step 3:
If using toothpicks or popcicle sticks, have an adult place dollops of glue over the edge of the stick.  This will prevent the sticks from falling out.  If using straight pins, run a strip of masking tape over the pin heads to secure them to the tube.

This looks so gross.  Sorry.  But the glue holds the sticks in place.
Step 4:
Using a few strips of masking tape, close up one end.  Run a strip of take around the tube to clean up the ragged tape edges.  Because I didn't create a cover for the end of the tube, some of the couscous and lentils were stuck to the tape.  I don't think it made a big difference in the overall sound, but you could always cut out a circle for the end of the tube and affix that.

Step 5:
Fill tube with beads, beans, rice, etc.  You don't need much.  You may want to experiment with the sound by pouring in some beads, covering one end, and flipping it over.  Once you find the desired effect, close up the tube with more masking tape.

Step 6:
Decorate the tube.

Did you know rainsticks are ceremonial musical instruments used to invoke the rain spirits? They are made by people who live in the deserts of northern Chile. In Chile, rainsticks are traditionally made from dead cactus tubes with hundreds of cactus spines hammered into the tube. Tiny lava pebbles cascade gently through the tube, sounding much like rain. (Enchanted Learning)
-Rose  @-}---