Time: 20+ minutes
Cleanup: rubber bands will probably be stuffed in your couch cushions; otherwise cleanup us a breeze!
What You Need:
-little piece of scrap wood
-5 nails or push pins
-hammer (if you're using nails)
-1 c-clip or paper clip
-lots of little rubber bands
-crochet hook (optional)
Why I Like This Craft:
I enjoyed the challenge of trying to figure out different patterns without having the actual Rainbow loom. And I love that my son loves making these things as much as I do!
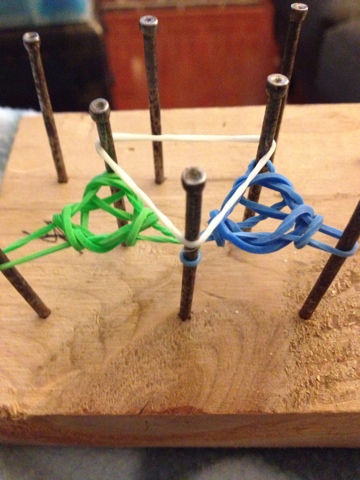
Step 1:
Hammer your nails into the wood in the shape of a 'M'. Keep the nails about an inch apart. When you stretch a rubber band on 2 adjacent nails, there should be slight tension.
Step 2:
Grab 3 rubber bands from your pile. Twist each in a figure 8. Stretch each '8' over 2 nails, forming a triangle.

Grab 1 rubber band from your pile. Stretch that band over your existing rubber band triangle. (Triangle #1)

Now, pull the bottom band over the top band and off the nail. Do this for each off your 3 nails.
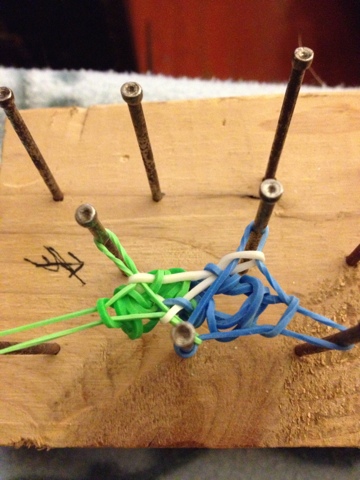
Step 5:
Grab 3 more rubber bands from your pile. Twist each of these into a figure 8 and stretch each over 2 nails, forming another triangle (similar to Step 2). This time share the bottom-middle nail for the lower left point of your triangle.

Grab one rubber band from your pile. Like Step 4, stretch this band over this new triangle. (Triangle #2)
Step 7:
This is the trickiest part! On the nail where the 2 triangles overlap, pull both bottom rubber bands over the top rubber band and off the nail. Do the same for the other 2 corners.

Grab one rubber band from your pile. Stretch this rubber band over 3 nails connecting both existing triangles. (Triangle #3)
For each the nails making up this triangle, pull the bottom band over the top band and off the nail.
Grab 1 rubber band from your pile. Stretch it over 3 nails the make triangle #1. Pull the bottom band over the top band and off each nail in Triangle #1.
Step 11:
Grab 1 rubber band from your pile. Stretch it over 3 nails the make triangle #2. Pull the bottom band over the top band and off each nail in Triangle #2.

Grab 1 rubber band from your pile. Stretch it over 3 nails the make triangle #3. Pull the bottom band over the top band and off each nail in Triangle #3.
Step 13:
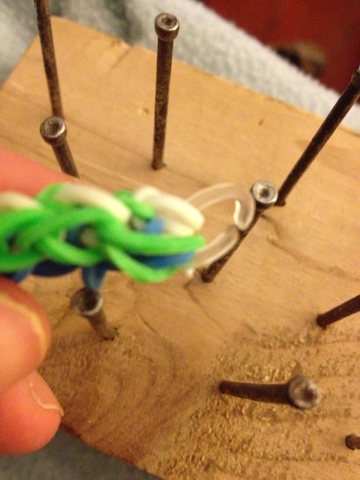
Keep doing Steps 10-12 until your bracelet is long enough.

Grab your c-clip (or bend a paper clip) and hook all of your bands on the nails into the clip. Then hook the starting bands to the clip.

-Rose @}----
|
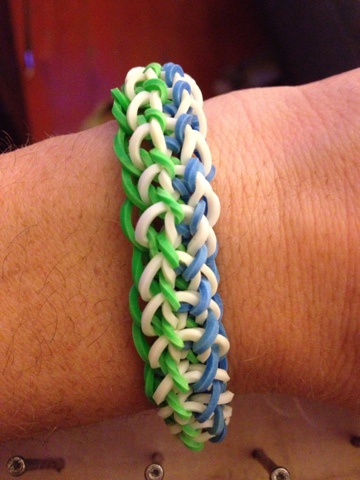
| Side 1 |
 |
| Side 2 - it's reversible! |
Can you post how to make the loom; measurement of nail placement and such...Thanks
ReplyDeleteThis comment has been removed by the author.
ReplyDeleteWhat ever be the event either birthday party, college fest, get together, disc party, pool party or any other; Rubber Bracelets plays a vital role in every field. I love rubber bracelets as they are available in various designs and shapes.
ReplyDelete