Sunday, February 13, 2011

Ice Cream Cone Cupcakes & Carrier

Last week I took my 4 year old to a birthday party.  For dessert we had ice cream cupcakes.  I've been making these for years (before I even had kids), but was surprised at how many of the moms have never seen these before, so I decided to post the how-to here.  I was also shocked that that 4 year olds actually ate the cupcake and instead of just the icing.  So I'm hoping these will be the perfect cupcakes for my son's Valentine's party at daycare.  The hardest part of these cupcakes is transporting them to the destination.  I've also included a step for making an impromptu cupcake carrier to prevent them from toppling over.
Age: 4+ (This is mostly a mom craft, but my son did help make the little heart decorations and enjoyed licking the beaters.)
Time: 20+ minutes for the decorating, about 20 minutes to make the candy decorations.
Mess/Cleanup: Typical kitchen mess when it comes to cupcakes.  I used store bought frosting, the cleanup was minimal. I just tossed the baggie in the trash.
What You Need:
  • Cake Mix (make according to package instructions)
  • Cake Ice Cream Cones. I just used a box of mix, which makes about 20 cupcakes in the cones.
  • 2 - 16 oz cans of frosting.  I use a lot of frosting for these cupcakes to get the effect of an ice cream swirl.
  • Plastic Baggies.  I like to use the gallon non-zip baggies.
  • 2 cereal/cone boxes. I used the cone boxes.  They were the perfect size.
  • Cupcake decorations

Why I Like This Craft:  I love making cupcakes and for years this has been one of my favorite.  Minimal effort for a big impact.

Step 1: 
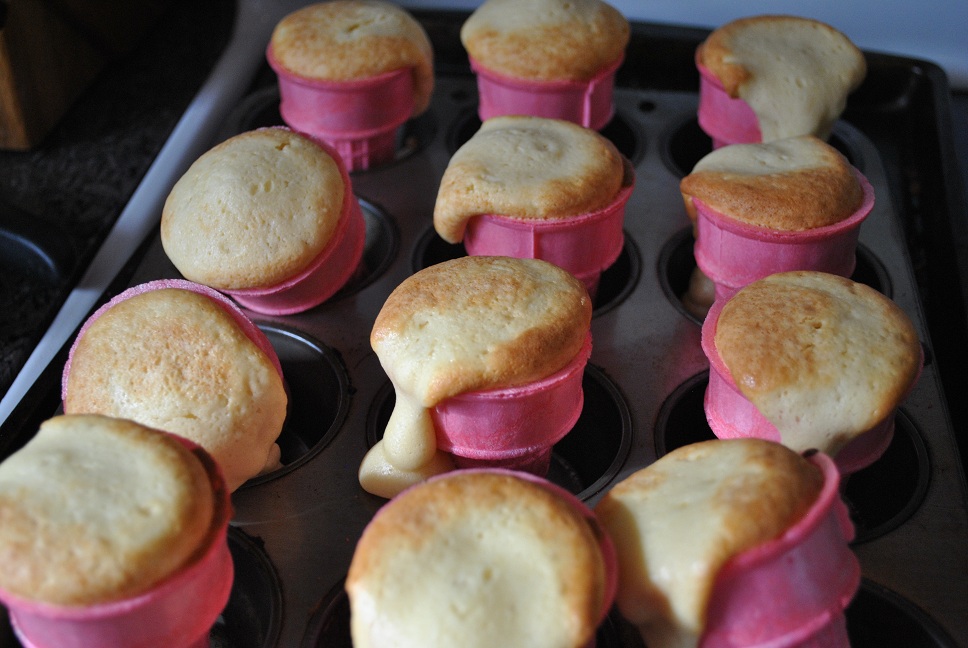
Prepare cake mix and fill cones.  Fill to about 1 inch from the top edge.
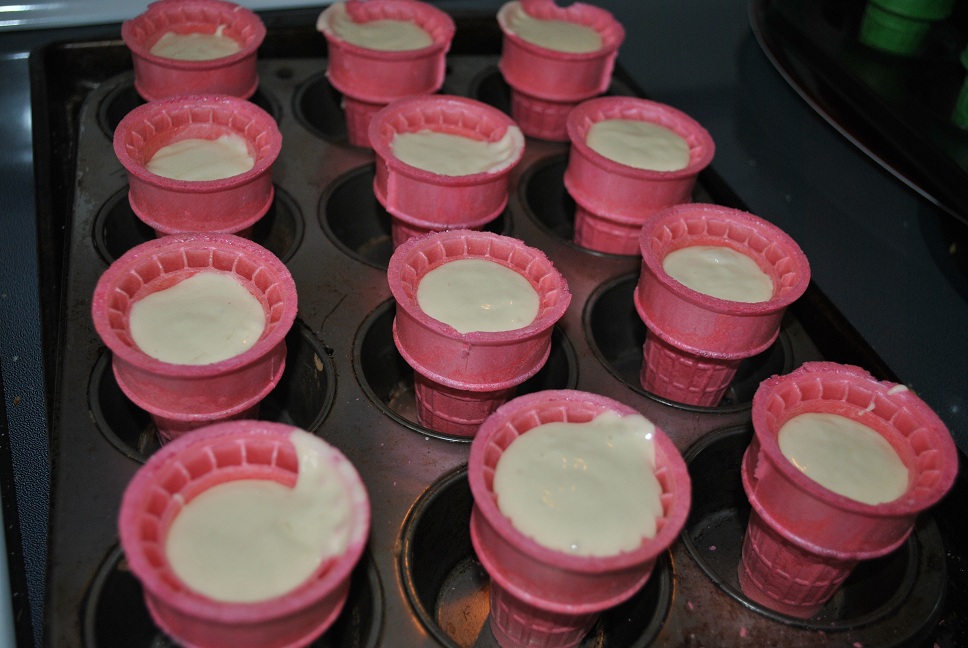
Don't fill the cups too much.  As you can see below, I had a few over topping after baking.

If this happens, while the cake is warm pull off the goop that spilled over.

Step 2:
Bake cupcakes according to box instructions.


Step 3:
While the cupcakes are cooking or cooling, make the tray for the cupcakes.  At first, I didn't have a special tray to hold the cupcakes upright.  As soon as I moved the my tray almost all of the cupcakes toppled over, messing up the perfectly iced cakes.  Uggh.  But I'm sure the 4 year olds won't notice. 

Here is my little solution for the cupcakes to survive the car ride.  Using the cardboard boxes, trace circles a little larger than the diameter of the cone (I actually used a cap from one of my spices).  Using scissors, cut out the circles.  
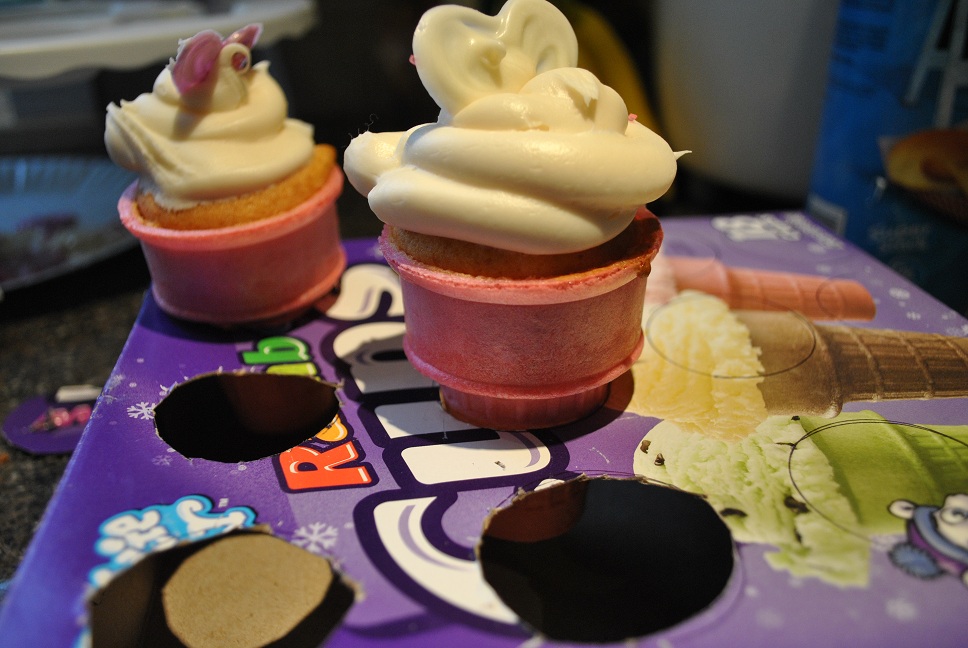
I was able to fit 12 holes in each box.

Step 4:
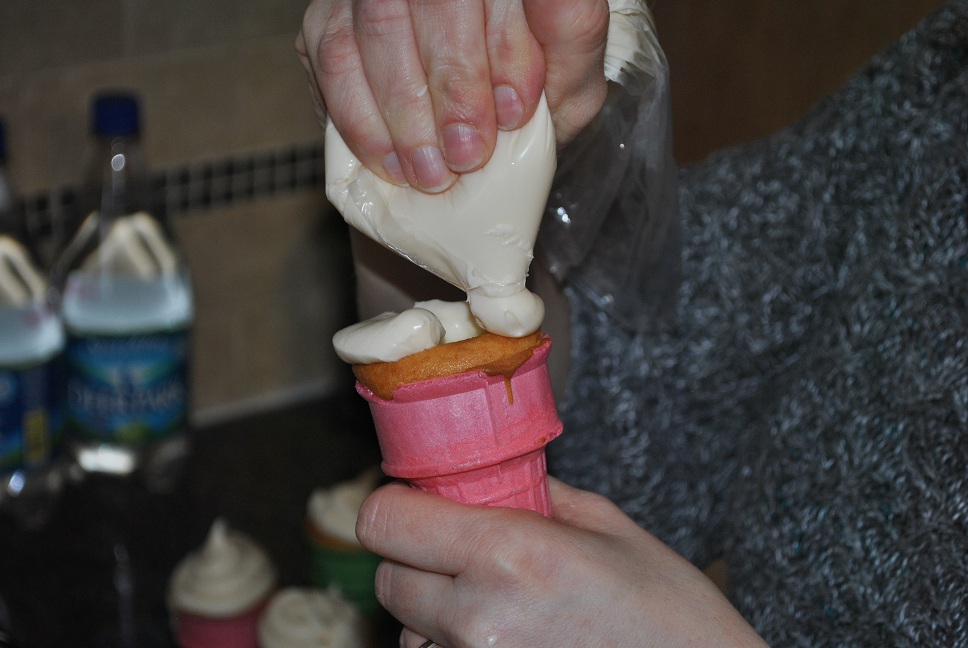
Once cupcakes are cooled, transfer icing into plastic baggie.  Squeeze all of the icing to one corner of the bag.  Snip off about 3/4 inch of the corner.

Step 5:
Ice the cupcakes.  To get the swirl effect, use the baggie to ice the cupcakes.  Starting from the outside edge, squeeze the frosting onto the cake.  Swirl to the middle of the cupcake.

Step 6:
Place iced cupcake in the tray and finish the decorations.  We created white chocolate hearts to top the cupcakes.

Enjoy!
--Rose @-}---

Valentine Chocolate Pops (No Mold Needed!)

Both of my kids have Valentine's Day parties at daycare.  I have to bring in something for the 2 & under crowd and forgot to pick something up for her classroom when I was at the store.  I went digging through the baking cabinet and found some Candy Melts left over from the Cookie Lollipops and the Care Bear Cupcakes, so I decided to wing it and make some White Chocolate Heart Lollipops with what I had.

Time: 20 minutes +
Age: 4+
Mess/Cleanup:  About 10 minutes.  Longer if your toddler spills 2 containers of sprinkles all over the floor.
What You Need:
  • Wax Paper
  • Popsicle Sticks 
  • Candy Melts (or white chocolate chips)
  • Sprinkles
  • Empty ketchup/mustard bottle or a baggie
Why I Like this Craft:  I didn't have to run back to the store to pick up more treats!  These were pretty easy to make and for the little tykes, there's not an awful lot of candy in these pops.  We kept them pretty small.  My 4 year old also loved helping to decorate them.

Step 1:
Melt the Candy Melts in the microwave at 30 second intervals.  Stir in between until smooth.

Step 2:
Transfer melting chocolate to a baggie or a bottle.  If using a baggie, snip off one corner.  For these, I used a baggie.  You have less control over the flow of the chocolate, but the cleanup is easier.

Step 3: 
Make heart shapes on a piece of wax paper.  While chocolate is still warm press the top of a popsicle stick into the heart.

Step 4:
Cover the stick with more chocolate.

Step 5:
Sprinkle on some sprinkles and let cool.

Step 6:
Bag 'em up and you're ready to go!

--Rose @-}---


Monday, February 7, 2011

10-Minute Jet Pack Craft

This weekend we had two preschooler birthday parties.  After all the wrapping we had an empty wrapping paper tube sitting on the dining room table.  Just before I tossed the tubed into the recycling bin, we whipped this little jet pack together while dinner was cooking on the stove.  It only take a few materials and a few minutes to make.
My son is now into the Despicable Me movie.  He particularly loves the part where Vector zooms around with his jet pack (or as my son calls it, his "Rocket Jet Pack").  
Age: 3+
Time: 10+ minutes
Cleanup: A few paper scraps, that's it!
What You Need:

We used some old drawings for the paper scraps

  • Wrapping Paper Cardboard Tube (paper towel tubes or Pringles can would probably work too)
  • Tin foil
  • Yarn or ribbon (2 pieces, about 24 inches each)
  • Red, orange, and yellow paper scraps
  • Scissors
  • Glue (To make things quicker, I just used the hot glue gun to stick everything together.  You could staple or use craft glue to adhere the pieces).

Why I Like This Craft:
This was so quick and easy to make (as are most of the crafts on this blog).  And any craft that can double as a costume accessory is always a plus!  I love pretend play!

Step 1:
Cut tube in half.

Step 2:
Cover tubes in foil.
Step 3:
Glue tubes together.

Step 4:
Poke 2 holes at the top and bottom of each tube.

Step 5:
For each tube, tie the piece of yarn  to the top and bottom of tube to make a backpack.

Step 6:
Cut scraps into flame shapes.  I drew some shapes on the paper and my son cut out the pieces.

Step 7:
Glue the flames to the bottom of the rocket jets.  All done!

See, so easy!

-Rose @-}---

Wednesday, February 2, 2011

Make your own fancy paper purse or Valentine holder


  This project was inspired by my daughter searching for something to put her little Peter Pan action figure in while she made up some random obstacle course in the play room (my craft room).  I had an extra-wide lovely cardboard photo holder from some prints in the recycle bin and a purse was born. It would be great for holding Valentines, too!

Age:  3+
Time: 15-25 minutes
Materials:
  • Envelope-style photo holder left over from a photo print order (mine was sturdy cardboard and extra wide from Photoworks)
  • paper or cardstock to cover the photo holder (or fabric if you have a sturdy photo holder)
  • glue or tape
  • embelishments that will stick to paper-we used die cuts 
  • glitter glue (paint brush optional)
  • scissors
  • 2 to 3 ft of ribbon or string
Alternatives:  flimsy paper photo holders would work if you use heavier cardstock to cover it. You can also substitute any kind of stickers or cut out your own shapes to decorate the purse. 
Most of the materials we used (the coveted glitter glue is clutched firmly in her hands)
Step 1:  Cover the photo holder with paper.  We opened up the photo holder and started on the outside flap and worked our way to the inside.  We needed two sheets of 12x12 scrapbook paper to cover this extra wide photo holder.  This still wasn't wide enough for our envelope so I used some cardstock strips along the side (which ended up making it extra fancy). 
My three year old liked using the glue stick.  It was quite easy since the paper was so large and sturdy. 

Matching the stripes on the inside

Trim off the excess paper and tuck a bit inside.  Have your kid glue it down.


 I recommend tucking a little extra on the inside flap (shown below).

Step 2:  Tell your kid for the 10th time in 2 minutes it is still not time to play with the glitter glue.


Step 3:  Add some cardstock to the side to make it fancy and cover any remaining part of the photo holder.  We used self-adhesive cardstock strips to make it really fast and easy to attach but any paper strip will work just fine.

Fancy border covers the remaining Photoworks photo holder

Cardstock strip on the side to cover the remaining photo holder that was showing-and a random scrap of cardstock on the inside flap that is not part of the finished product.
Step 4:  Make it fancy!  We used a glue stick and some double-sided tape to add some flowery and swirly die cuts and some glitter glue.


Glue stick time
Glitter glue time!!!!  She used a paint brush to spread out the huge piles of glitter she glopped on there.

Step 5:  Measure a length of ribbon using your kid as a guide.  Leave a little extra to make some knots at the end once it's threaded through the purse.

Step 6:  Snip some holes for your purse strings.  Make sure you cut through both layers.  If by chance you cut too far (or rip the paper while putting the string through like I did) just tape it up.

Snip!
Step 6:  Thread the ribbon through the holes you snipped and add a bit of tape to the inside for added strength. 
Poke!
Step 7:  Tie a knot on the inside and add a piece of tape to secure it.

My kid took this photo. 

Tape!
Now show off your fancy purse!!

Front of purse
Back of purse


Valentine embelishments inside
--Nancy

Thursday, January 27, 2011

Action Figure Paper Dolls - Iron Man

I've created a crafting monster out of my 4-year old ever since we started this blog.  Lately, every night he's been asking what kind of craft we'll be making.  This evening I had a bunch of craft supplies out on the table and he decided he wanted to make an Iron Man.  He ran up to his room to get his action figure and promptly began to trace him.  I grabbed my camera and this is how craft evolved...Iron Man (or any action figure) paper dolls.
He's very proud of his paper Iron Man
Age: 3+
Time: 20+ minutes
Mess/Cleanup: Just some paper scraps.  5 minutes (though my dining room table is still covered with the aftermath)
What You Need:
  • Big Action Figure (we used his 10" Iron Man)
  • Pen
  • 1 sheet of Construction Paper (Red for Iron Man)
  • 1 small sheet of Oak Tag or other stiff paper or flat board
  • 1 Self-Adhesive Jewel (for Iron Man's core)
  • Self-Adhesive Glitter Foam (I really love this stuff. I have found so many uses and it really makes cleanup easier.)
  • Scissors
Why I Like This Craft:
We were just set to settle into the evening of Nick Jr. and Sprout when my son decided he really wanted to do a craft.  I couldn't deny his creativity, so off we went.  The 30 minutes making Iron Man was far better than 30 minutes in front of the TV.  Plus, I think my son had a really good idea.  Paper dolls aren't just for girls.  Heck, sometimes it's hard to think of boy crafts.  He's not all that interested in making tissue paper flowers or hair bows.  I'm glad he thought of this.  He has already requested that we make Batman next. 

Step 1:
Lay out action figure on oak tag and trace.  My son did trace most of this and I was really surprised at how well this worked.  The outline comes out pretty decent.
Step 2:
Cut out shape.

Step 3:
Trace action figure on construction paper to make a "suit".  For the Iron Man novices, in Iron Man 2 he has 2 suits.  We decided to make the red one.
Step 4:
Cut out suit.  When cutting out the suit, be sure to leave some "tabs" so they suit can be folded over the oak tag body.  I did help my son with the cutting of the suit.  I'm sure the tabs would have been snipped off.
Step 5:
Decorate the suit.  We used a jewel for his core.  I also cut up some of the glitter foam to make a helmet and some leg pieces.  Ok, I know this looks a little rough.  But for a 4-year old, this is awesome.
Our decorations are slim.  Bedtime was approaching.
Step 6:
Enjoy your happy kid!

-Rose  @-}---

Sunday, January 23, 2011

Puppy Dog Valentine Bags

Since Nancy is already in the spirit of Valentine's Day, I figured I better catch up.  I've been checking out the latest Oriental Trading catalog for some craft ideas for some time, and thought today was as good as any to test one out.  I had my son go through the catalog and pick out some crafts he was interested in and I would attempt to duplicate it.  Here's our little valentine holder we made today:
Sorry, smiles not included :(

Age: 3+
Time: 15 - 45 minutes.  I pre-cut all of the pieces and just had my son assemble the puppy.  It only took about 10-15 minutes. However, my son told me that this craft was too quick.  If you have little ones that can easily cut out the pieces, you might want to reserve some of the cutting for them.
Mess/Cleanup: I chose to use a stapler and a glue stick, which greatly reduced the mess.  We just had some felt scraps to clean up.
What You Need:
  • 1 paper plate
  • 1 brown paper bag
  • 1 piece of light brown felt/construction paper/craft foam
  • 1 piece of dark brown felt/construction paper/craft foam
  • 1 small piece of red felt/construction paper/craft foam
  • 1 small piece of black felt/construction paper/craft foam
  • 2 large googly eyes
  • Black marker
  • Scissors
  • Stapler
  • Glue
Step 1:  Cut out all of the pieces
  • Here are the pieces you need to cut from the felt, construction paper, or craft foam:
    • 1 red heart (eye patch)
    • 1 black heart (nose) 
    • 1 large oval (head)
    • 2 bean shapes, light brown (front paws)
    • 4 ovals, dark brown (eyes & back paws)
  • Here are the pieces you can cut from the paper plates
    • Cut the inner circle of the paper plate
    • Cut a name tag and mouth

Step 2: Write Name on Tag
Have you little one write their name on the tag.  Using the black marker, I edged the tag to make it stand out a little more.


Step 3: Assemble the pieces
Here are the pieces laid out on the paper bag.  We used a stapler to attach most of the pieces, and a glue stick to adhere the eyes and tummy. I did add a little detail to the mouth using the black marker.

Attach ear to head and staple both pieces to the bag.
I added little "x's" to point out where the glue should go for the front and back paws.

Glue on the the eyes.

That's it.  We're all ready for our Valentines!


-Rose

Crayola Color Explosion Marker Replacements

This is just a little tip for those of you with Crayola's Color Explosion sets.  This morning my son was adamant about coloring in his color explosion book, but our "color-revealing" marker was dried out.  In efforts to avoid a mid-morning meltdown and a trip to the store, I tried one of my tricks and thankfully it worked!  Did you know you can use plain old white vinegar?  Well, you can!  I just poured a little vinegar in a cup and brought out the paint brushes.  I'm sure you could also dip your existing marker in the vinegar.  He then just painted on the pages and the color finally exploded! 

Edited to add:  It's now 30 minutes post craft - and the vinegar really dissolved the black overlay.  Unfortunately both of my kids are stained blue.  I now have to Google how to get the "paint" off of them.  Any suggestions?  So, use the vinegar sparingly and watch your kiddos closely :)

-rose